The roofing project I wrote about a few blogs has been shingled. I have put a few photos of the finished result in this blog. This photo is of a small dormer with a door underneath it. At the bottom of the roof, you can see a black line. That is the back side of drip edge, I place it at a slight angle over the door area so that the rain from the roof does not flood the homeowner when entering or exiting during a rain.
The slight buildup in the shingles is due to the roof was sheated with 15/16 OSB and the edges where the underside allows the wood to be visible is 8” shiplap. I also burn a shingle to establish my edges. This build helps the roof shed water in the body and not over the sides.
Thew cap is a premade preformed cap the coordinate with the Malarkey Solor Reflective Shile line I recommend. This line of shingles are American Standard; they lay nicely and hold up well.

The photo below shows the long run of the roof. That run is over 60 feet. At the two pitches of the roofs transition, I used an 18-inch valley metal to help make the transition more uniformed. Between the two roof penetrations is where one of the misaligned fill jobs was located. The other person who worked on this project nailed their rafter into the shingles and not on a backer board. After tearing out that work I cleaned the area for a backing board and then cut new rafters to fill the transition. As I did so I checked my line by using a level as a straight edge. Once this was accomplished, I covered the seams with the Valley metal also. The two sheets of OSB are stored there awaiting the finishing of the other side of this roofing system.
I cut my ship lap back where there is a lower extension of the roof line. This is so I can have my shingles go over the top and then my caps slide in. once this is done I place more valley metal over the area and shingle up the larger roof . This allows the caps to appear to grow out of the lower section.

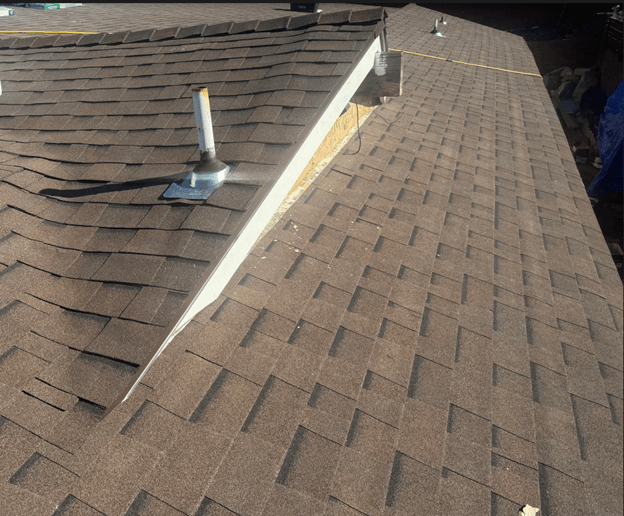
Even though you cannot see it there is rolled valley metal in that laced valley. Where the two opposing roof pitches are the same (4/12) the weave is one two one, but at the upper portion where the pitches differ greatly the weave is 3 to 1. It is true that it took a little longer to do all the little things to help this roof have crisp lines but at the end of the project I will know it has all been worth it because the finished product shows workmanship which some have thought was forgotten. People have come by to comment on the project and tell me its looking good. Some came with lawn chairs to watch for a while. The facia that is at the ends of the dormers and over another roof doo not rest on the roof below to help prevent rot. All my overhangs are hand nailed so that none of the nail penetrate through the lumber. I also nail every shingle for high winds. I tuck my first shingle under all roof jack where I have a roof penetration and then I cut the other shingle and nail the side of the jacks flanges while laying the shingles.I do not not nail the down side of the jacks flange.
Note: Images
on this blog site are from a free source or taken by the author. No image or
group of photos is intended to represent the people the author serves. The
author does not care about Race (that is a politically correct term that he
does not like because we are all of the same Race, the Human Race. He prefers
the term ethnicity), color, religion, sex, gender, marital status, disability,
genetic information, national origin, source of income, Veteran or military
status, ancestry, citizenship, primary language or immigration status. He is a
service provider for all people. We will all rise together when we band
together and help one another. Joseph Erwin is a Real Estate Broker, DRE #
O2131799, and a CA general contractor # B 696662. He’s a member of the CRMLS
and The East Valley Association of Realtors located in the Inland Empire region
of Southern California.

Leave a comment